Thanks Shawn at sevenforums for these tutorials. I have the diskpart portion here because I'm terrible using favorites, Shawn has the regular disk management listed on his site also. Shawn, if by some chance you find this and you want me to take this down I will.
Update:
I recently went through this again because I had a disk that would show up in disk management as unallocated/not initialized. I couldn't do anything to it through disk management.
Where it has you do list volume I changed it to list disk, this showed me the two available disks.
I then ran the following commands:
select disk # (enter the number of the disk you want to impact)
attributes disk clear readonly
This cleared any readonly attributes on the disk. I'm not sure if this was entirely needed, I'm just writing down what I did based on stuff I found online.
I then ran the following commands:
select disk # (enter the number of the disk you want to impact)
create partition primary
This got me back to RAW and I was able to format through Disk Management.
**Note: All hyperlinks will take you to the sevenforums tutorials, I just have the delete partition and create partition here for my own quick reference**
*****************************************************************************
original source: http://www.sevenforums.com/tutorials/2668-partition-volume-delete.html
Using Diskpart in a Elevated Command Prompt
1. Open a elevated command prompt, or a command prompt at boot.to format, follow steps 1-4 above, then
2. In the elevated command prompt, type diskpart and press Enter. (See screenshot below)
3. In the elevated command prompt, type list volume and press Enter. (See screenshot below)
NOTE: This will give you a list of volume numbers to select from to delete.
4. In the elevated command prompt, type select volume # and press Enter. (See screenshot below)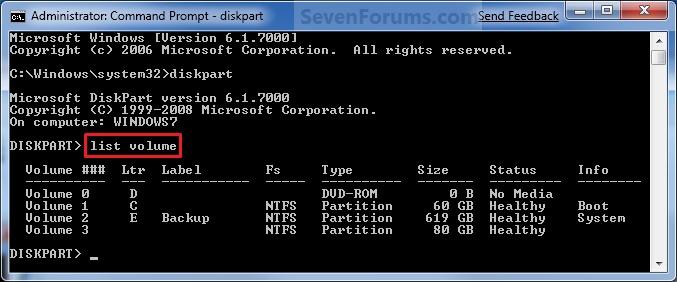
NOTE: You would substitute # for the volume number listed that you want to delete. For example, I want to delete the listed volume 3, so I would type select volume 3 and press Enter.
5. In the elevated command prompt, type delete volume and press Enter. (See screenshot below)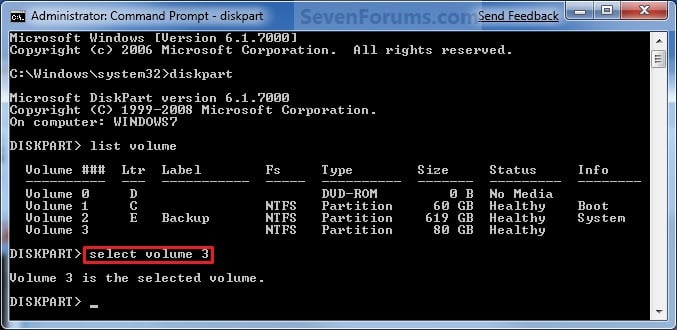
NOTE: If it fails to delete, then use type delete volume override and press enter instead.
6. In the elevated command prompt, type exit and press Enter. (See screenshot below)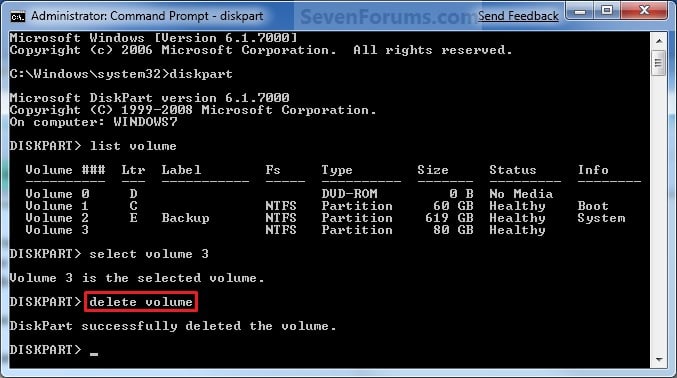
7. Close the elevated command prompt.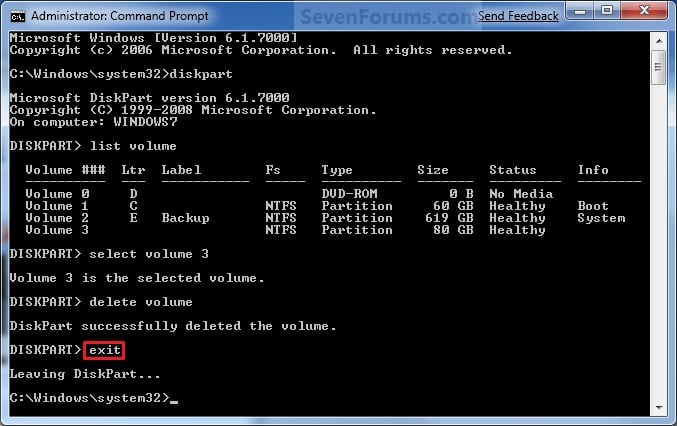
8. The selected partition (step 4) is now deleted and is now unallocated space on the disk.
NOTE: You can use this unallocated space to create a new partition with, or extend another partition on that same hard disk into it.
5. In the elevated command prompt, type create partition primary and press Enter. (See screenshot below)
NOTE: This will create a new blank RAW partition with selected disk (step 5) that contains the unallocated partition free space.
6. In the elevated command prompt, type list volume and press Enter. (See screenshot below)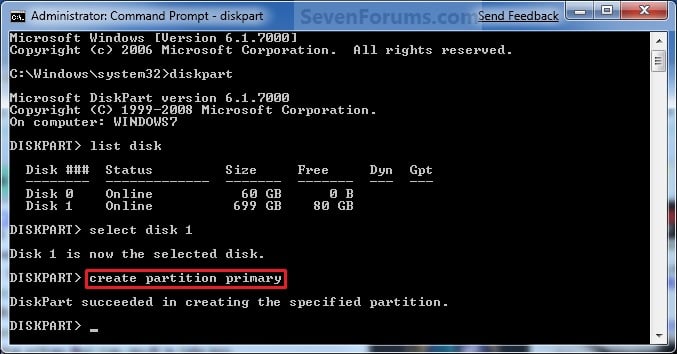
NOTE: Look for the volume number that has the same Size as from the Free space in step 4. For example, Volume 3.
7. To Format the Partition or Disk as a NTFS File System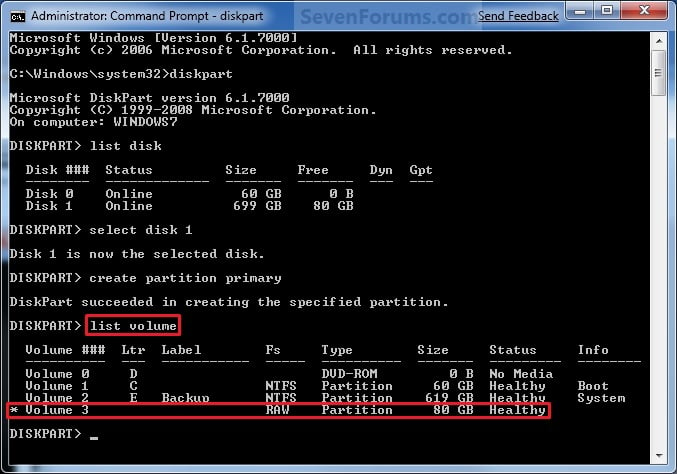
NOTE: This would be good for using with a HDD as an example.
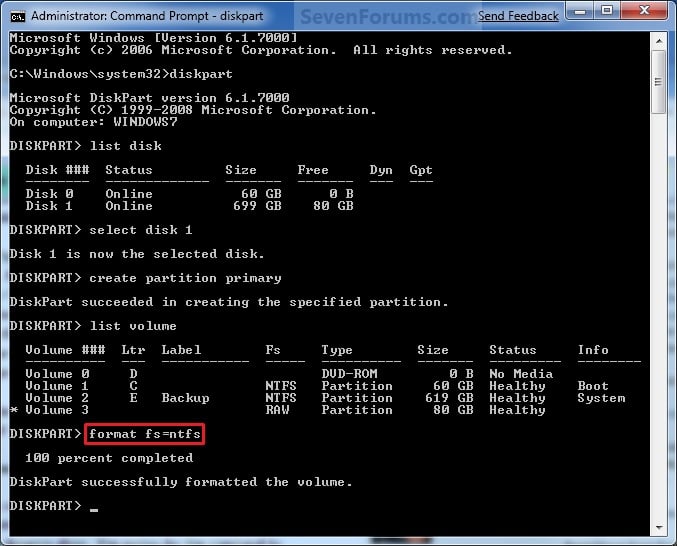
A) In the elevated command prompt, type format fs=ntfs quick and press Enter. (See screenshot below)8. When it is finished formatting, type exit in the elevated command prompt and press Enter. (See screenshot below)
NOTE: Having quick added at the end of the command will do a quick format instead of a full format on the new blank RAW partition (step 6) to make it a new partition.
9. Close the elevated command prompt.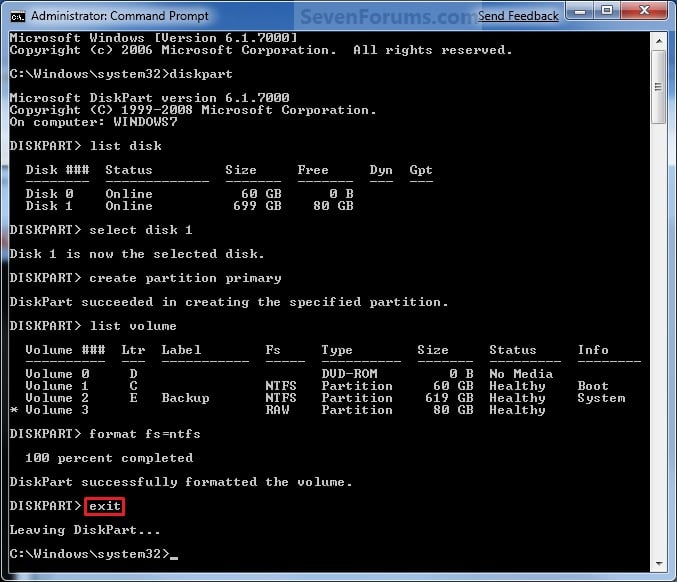
10. The new primary partition has now been created. You can now see the new partition in Computer with a drive letter.
******************************************************************************
At this point the drive will be in the RAW format and will be accessible by Windows Computer Management. You can format to NTFS or FAT32 if you wish and use the drive like you were before it broke.

THANK YOU!!! ♥ ♥
ReplyDelete